
Cassandra--搭建单节点和集群
本篇博客主要讲一下Cassandra的搭建,单节点和集群。都是一些操作和注意事项,没有什么难点,按照下面一步一步操作就行。该系列博客使用的目前最新的版本cassandra-3.11.1。
下载
- 下载jdk1.8(Cassandra 3.0 and later require Java 8u40 or later.):
http://www.oracle.com/technetwork/java/javase/downloads/jdk8-downloads-2133151.html - 下载Cassandar:
http://www.apache.org/dyn/closer.lua/cassandra/3.11.1/apache-cassandra-3.11.1-bin.tar.gz
单节点安装
安装JDK1.8
- 因为机器中已经安装了jdk1.7,现在还需要一个jdk1.8,所以打算重新使用一个cassandra用户,然后配置该用户环境变量为1.8
1
2
3
4
5
6
[root@xiaoxiaomo data]# tar -zxvf apache-cassandra-3.11.1-bin.tar.gz
[root@xiaoxiaomo data]# ll
total 17
drwxr-xr-x 8 root root 4096 Nov 9 11:20 apache-cassandra-3.11.1
[root@xiaoxiaomo data]# useradd cassandra ##添加用户
[root@xiaoxiaomo data]# passwd cassandra
上传解压
- 我们这里上传到/data目录,然后解压
tar -zxvf apache-cassandra-3.11.1-bin.tar.gz1
2
3
4
5
6
7
8[root@xiaoxiaomo data]# tar -zxvf apache-cassandra-3.11.1-bin.tar.gz
[root@xiaoxiaomo data]# ll
total 17
drwxr-xr-x 8 root root 4096 Nov 9 11:20 apache-cassandra-3.11.1
[root@xiaoxiaomo data]# chown -R cassandra:cassandra apache-cassandra-3.11.1
[root@xiaoxiaomo data]# ll
total 17
drwxr-xr-x 8 cassandra cassandra 4096 Nov 9 11:27 apache-cassandra-3.11.1
添加环境变量
- 切换到cassandra用户,加入java环境变量到~/.bashrc
1
2
3
4
5
6
7
8
9
10[root@xiaoxiaomo data]# su cassandra
[cassandra@xiaoxiaomo ~]$ vim ~/.bashrc ##修改用户环境变量如下
.bashrc
Source global definitions
if [ -f /etc/bashrc ]; then
. /etc/bashrc
fi
export JAVA_HOME=/data/jdk1.8.0_151
PATH=$JAVA_HOME/bin:$PATH
[cassandra@xiaoxiaomo ~]$ source ~/.bashrc
启动cassandra
通过
bin/cassandra启动cassandra服务1
2[cassandra@xiaoxiaomo apache-cassandra-3.11.1]$ ./bin/cassandra -f ##前台启动
[cassandra@xiaoxiaomo apache-cassandra-3.11.1]$ ./bin/cassandra ##后台启动启动日志

- 集群节点状态,通过cassandra提供的
nodetool命令
配置cql运行环境
如果要运行cqlsh,需要python2.7即以上版本
下载python(我下载的是2.7.14):https://www.python.org/ftp/python/1
2
3
4
5[cassandra@xiaoxiaomo data]$ exit ## 退回到root用户
[root@xiaoxiaomo data]# tar -zxvf Python-2.7.14.tgz
[root@xiaoxiaomo data]# cd Python-2.7.14
[root@xiaoxiaomo Python-2.7.14]# ./configure --prefix=/usr/local/python2.7.14
[root@xiaoxiaomo Python-2.7.14]# make && make install配置python环境变量
1
2
3
4
5
6
7
8
9
10
11
12
13
14
15
16
17
18
19
20
21
22
23
24
25
26[root@xiaoxiaomo Python-2.7.14]# ll /usr/local/python2.7.14/bin/
total 6164
-rwxr-xr-x 1 root root 115 Nov 9 14:43 2to3
-rwxr-xr-x 1 root root 113 Nov 9 14:43 idle
-rwxr-xr-x 1 root root 98 Nov 9 14:43 pydoc
lrwxrwxrwx 1 root root 7 Nov 9 14:43 python -> python2
lrwxrwxrwx 1 root root 9 Nov 9 14:43 python2 -> python2.7
-rwxr-xr-x 1 root root 6273931 Nov 9 14:43 python2.7
-rwxr-xr-x 1 root root 1701 Nov 9 14:43 python2.7-config
lrwxrwxrwx 1 root root 16 Nov 9 14:43 python2-config -> python2.7-config
lrwxrwxrwx 1 root root 14 Nov 9 14:43 python-config -> python2-config
-rwxr-xr-x 1 root root 18561 Nov 9 14:43 smtpd.py
[root@xiaoxiaomo Python-2.7.14]# su cassandra
[cassandra@xiaoxiaomo Python-2.7.14]$ vim ~/.bashrc
[cassandra@xiaoxiaomo apache-cassandra-3.11.1]$ cat ~/.bashrc
.bashrc
Source global definitions
if [ -f /etc/bashrc ]; then
. /etc/bashrc
fi
export JAVA_HOME=/data/jdk1.8.0_151
export CASSANDRA_HOME=/data/apache-cassandra-3.11.1
PATH=$JAVA_HOME/bin:$CASSANDRA_HOME/bin:/usr/local/python2.7.14/bin:$PATH
[cassandra@xiaoxiaomo ~]$ source ~/.bashrc
运行 cqlsh
cqlsh,cassandra内置的交互命令,可以通过该命令操作cassandra1
2
3
4
5[cassandra@xiaoxiaomo apache-cassandra-3.11.1]$ ./bin/cqlsh
Connected to Test Cluster at 127.0.0.1:9042.
[cqlsh 5.0.1 | Cassandra 3.11.1 | CQL spec 3.4.4 | Native protocol v4]
Use HELP for help.
集群安装
- 如上步骤,在其他节点上创建用户,安装jdk、Cassandra、python
- 统一集群的名字
- 为每个节点分配一个IP
- 确定种子节点,不需要配置全部节点
- 如果是多数据中心,为每个数据中心和机架确定命名约定
操作
6.1. 配置cassandra.yaml,cluster_name集群名称|-seeds种子节点IP|listen_address和rpc_address指定为节点IP
6.2. 如下配置:1
2
3
4
5
6
7
8
9
10
11
12
13cluster_name: 'XXOCluster'
seed_provider:
# Addresses of hosts that are deemed contact points.
# Cassandra nodes use this list of hosts to find each other and learn
# the topology of the ring. You must change this if you are running
# multiple nodes!
- class_name: org.apache.cassandra.locator.SimpleSeedProvider
parameters:
# seeds is actually a comma-delimited list of addresses.
# Ex: "<ip1>,<ip2>,<ip3>"
- seeds: "10.141.5.27"
listen_address: 10.141.5.27
rpc_address: 10.141.5.276.3. 启动节点,优先启动种子节点,能看到其他节点和种子节点的一些通信

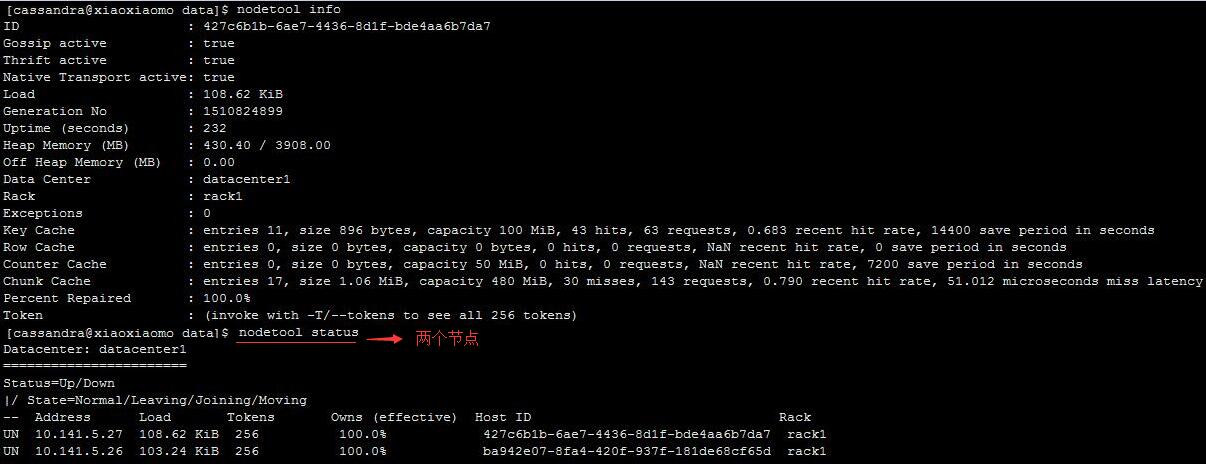
6.4. 查看节点机群状态
附
备注: 无法添加用户,运行:
useradd cassandra,提示:useradd: cannot open /etc/passwd
(线上环境:一般限制了某些文件的改动,此时我们需要修改一下文件属性)1
2
3
4
5
6
7
8
9##查看文件属性
[root@xiaoxiaomo data]# lsattr /etc/passwd
----i--------e- /etc/group
##修改文件属性
[root@xiaoxiaomo data]# chattr -i /etc/passwd
[root@xiaoxiaomo data]# chattr -i /etc/group
[root@xiaoxiaomo data]# chattr -i /etc/shadow
[root@xiaoxiaomo data]# chattr -i /etc/gshadow参考:
http://cassandra.apache.org/doc/latest/getting_started/installing.html